01__The Scaffold
Hi! Welcome to my dev diaries (name subject to change), where I go over my build process for this entire site! But first, let's get the elephant in the room out of the way.
This site will probably be HEAVILY over-engineered for what it actually does, as I get a lot of enjoyment from it. If that goes against what you expect from a statically generated site on this amazing, and quite frankly, super important platform, then...welcome! I hope you can have fun with this stuff despite that! After all, I tend to think that as a creator of sorts being true to my own aesthetics and approaches to be of paramount importance, (Is it presumptuous of me to treat coding as art more than a science? Who knows, but I'm having fun with this approach and that's all I care about in this case), esp since it's been a while since I've made something for me, ya know?
Anyway, despite that long intro, as of now, the complexity isn't crazy or anything just yet, but I plan to keep adding onto stuff and testing out different tech that i haven't used before. Let's break down some of the technologies I used, then go into my approach with code samples etc later on!
The Tech Stack
- Next.JS, and in extension, React
- MDX
- supabase
- TailwindCSS
So yeah, nothing too crazy just yet. That being said, I'm eventually planning for a rust backend since I'm currently learning about it, and think that it'd be fun to have that serve my content while building, instead of doing clientside supabase calls + content parsing. For now though, the above is all that I'm using.
If you're interested in my rust progress, i've been taking and annotating notes taken from the rust bible, so it's pretty cool! I'm currently learning about how rust handles smart pointers.
Justifications
So...why Next.JS? for that matter, why React at all? After all, It'd prob be just fine to use vanilla HTML, CSS, and keep JS for only lil bits of DOM manipulation etc, right? Well...cause it's fun mostly, but also because I think this'll end up making everything way more simple for me to post on once I have everything set up. (MDX section, for instance makes my life super easy since I tend to use MarkDown super heavily in my day to day note-keeping.)
That being said, I'm used to Next's pages router, so I elected to use the App router this time so that I can feel like I'm learning new stuff. Lemme tell you, some config felt way more obnoxious than the pages router, but let's roll with it.
For now, let's look at my project structure:
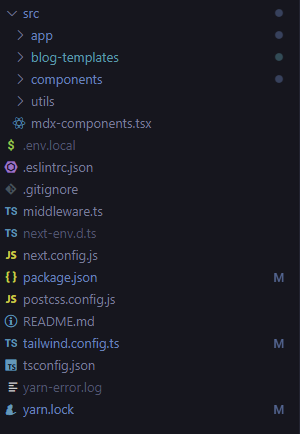
Just to prevent this from being a super long image, i'll show the
srcand root level stuff, and not bother with stuff like thepublic, oroutfolders etc.
The app folder itself is where all my routing/page generation actually takes shape, which is great:
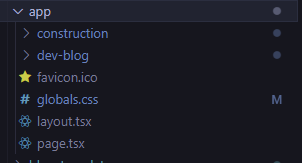
If you were to glance at my urls, you'd see the endpoints mirror the folders, which is one of my fave things that Next does for me!
Also, the app/page.tsx just refers to our home page, otherwise known as index.html in neocities verbiage:
Home
import { redirect } from "next/navigation";

export default function Home() {
  redirect("/construction");

  return (
    <main className=" flex min-h-[100vh] flex-col items-center bg-slate-400">

    </main>
  );
}
As we can see, this is pretty simple for now, I just have it redirect us to /construction on mount since I haven't actually done anything yet for the HomePage. It has absolutely nothing to do with the fact that I have no idea what overarching layout I want, I promise (help...)
Onto our next page!
/construction
import Link from "next/link";

import { createClient } from "@/utils/supabase/client";

import CheckListItem from "@/components/ChecklistItem";
import FriendBadgeContainer from "@/components/FriendBadges/FriendBadgeContainer";
import MyFriendBadge from "@/components/FriendBadges/MyFriendBadge";

import backgroundImage from "../../../assets/64d4520749a58717c1f21a69_Pondering.svg";
export const revalidate = 60;
const ConstructionPage = async () => {
const supabase = createClient();
const { data: tasks, error } = await supabase
.from("tasks")
.select("id,task, checked");
const sortedTasks = tasks?.sort((a, b) => {
return a.checked === b.checked ? -1 : a ? 0 : 1;
});
return (
<main
className="construction__checklist flex min-h-dvh flex-col items-center bg-pink-300"
style={{
backgroundImage: `url(${backgroundImage.src})`,
width: "100%",
backgroundRepeat: "no-repeat",
backgroundSize: "contain",
backgroundPosition: "left",
height: "100%",
}}
>
<h3
aria-label="announcement header"
className=" bg-slate-100 m-4 w-full max-w-[50ch] rounded text-center text-xl"
>
Hey, site's still under construction so expect everything
to be broken, but if you'd like to see it take shape feel
free to check back every now and then! 👷🏽
</h3>
<Link
href="/dev-blog"
className=" hover:bg-blue-200 rounded bg-slate-50 p-2 text-2xl "
>
I made the framework for starting a tiny dev blog! still not
responsive or anything yet though 😔😔
</Link>
<MyFriendBadge />
<FriendBadgeContainer />
<article
className="border-1 flex w-1/2 max-w-[100ch] flex-col items-center
rounded border border-black bg-indigo-100 p-4"
>
<h1
aria-label="checklist header"
className=" pb-4 text-4xl font-medium"
>
Basic framework needs:
</h1>
<ul aria-label="checklist">
{sortedTasks
? sortedTasks.map((item, index) => (
<CheckListItem
key={crypto.randomUUID()}
index={index}
checked={item.checked}
itemId={item.id}
>
{item.task}
</CheckListItem>
))
: null}
</ul>
</article>
</main>
);
};
export default ConstructionPage;
Whew! Ok, this is def a bit heavier than our Home page, huh? Still though, thanks to React's Component based architecture, this makes everything way visibly lighter code-wise than it actually is, which is great!
Let's break it down:
import Link from "next/link";
import { createClient } from "@/utils/supabase/client";
import CheckListItem from "@/components/ChecklistItem";
import FriendBadgeContainer from "@/components/FriendBadges/FriendBadgeContainer";
import MyFriendBadge from "@/components/FriendBadges/MyFriendBadge";
import backgroundImage from "../../../assets/64d4520749a58717c1f21a69_Pondering.svg";
So, as you can probably tell, these are imports. Basically I'm just telling React "Hey, lemme use these thingies in this file"
What's really cool is that you can prob tell by reading them that I actually have 3 main different types of imports going on here:
- Library utilities -
LinkandcreateClient: These are pieces of library code made by official maintainers etc, and I'm basically jsut yoinking their methods to use here to get some pre-built functionality. - Local components-
ChecklistItem,FriendBadgeContainer, andMyFriendBadge. In this case, we can treat components as simply lil subsections of code that I plan to use in places other than this page--Think of them as lego pieces that fit anywhere you want, like people or vehicle models! - Assets- In this case, an SVG (sourced from transhumans.xyz)
It's interesting noting this since it really shows the freedom we get from this.
The next line is pretty interesting, and is primarily for dev work, it isn't needed for neocities itself since this stuff is statically built, but sometimes I edit stuff on the backend and I don't want stale data to show up while i'm working in dev mode:
export const revalidate = 60;
This is a NextJS specific call that just makes them refetch data etc and reload my page in the background without any visible refreshes etc happening. Pretty neat! In this case, i set the interval to 60 secs.
const ConstructionPage = async () => {
  // --snip--
};
This here is our actual Page! For all of you who use vanilla HTML, this is prob where it starts looking a lil weird, but it's honestly conceptually simple at this layer, where we can just think of it as a function that returns our HTML. It's deeper than that, but we don't want to read about Shadow-DOMs etc, right? right? just in case this interests you, it's honestly pretty cool
But now, let's delve into the code itself!
const supabase = createClient();

const { data: tasks, error } = await supabase
	.from("tasks")
	.select("id,task, checked");

const sortedTasks = tasks?.sort((a, b) => {
return a.checked === b.checked ? -1 : a ? 0 : 1;

  return (
    <main
      className="construction__checklist flex flex-col min-h-dvh items-center bg-pink-300"
      style={{
        backgroundImage: `url(${backgroundImage.src})`,
        width: "100%",
        backgroundRepeat: "no-repeat",
        backgroundSize: "contain",
        backgroundPosition: "left",
        height: "100%",
      }}
    >
	{// --snip--}
	</main>
});
This is where we start seeing the power of using React. I present, an unholy combination of JS and HTML, working together!
const supabase = createClient();

const { data: tasks, error } = await supabase
	.from("tasks")
	.select("id,task, checked");

const sortedTasks = tasks?.sort((a, b) => {
return a.checked === b.checked ? -1 : a ? 0 : 1;
}
This block simply hits up our supabase tasks table, and sorts it, into a nice, cute lil variable called sortedTasks. Just in case you have no idea what this bit does:
a.checked === b.checked ? -1 : a ? 0 : 1;
It's way less complex than it looks, this is just shorthand for an if-else statement! This' called using ternary operators and in this case, it's literally just saying:
if (a.checked === b.checked) {
  return -1;
} else if (a.checked) {
  return 0;
} else {
  return 1;
}
So yeah, while the above if/else is honestly easier to read, ternary tends to be my de-facto approach, although it DOES get nasty when it's doing nested operations like I did. But hey, in this case i just googled an implementation and copy-pasted it before adjusting the sorting to make sure that my checked/struck through items are sorted to be on the bottom of my tasks list!
And then in this call:
 return (
    <main
      className="construction__checklist flex flex-col min-h-dvh items-center bg-pink-300"
      style={{
        backgroundImage: `url(${backgroundImage.src})`,
        width: "100%",
        backgroundRepeat: "no-repeat",
        backgroundSize: "contain",
        backgroundPosition: "left",
        height: "100%",
      }}
    >
	{--snip--}
	</main>
 )
We can now access our variables and even stuff we imported earlier! for instance, look at our backgroundImage entry:
backgroundImage: `url(${backgroundImage.src})`,
By wrapping our string in backticks, we can then do string templating to get access to variables etc! pretty sweet, ngl.
Onto our components!
      <Link
        href="/dev-blog"
        className="text-2xl bg-slate-50 p-2 rounded  hover:bg-blue-200 "
      >
        I made the framework for starting a tiny dev blog! still not responsive
        or anything yet though 😔😔
      </Link>

      <MyFriendBadge />
      <FriendBadgeContainer />
So if you check our imports, once again, we've already just imported these in! <Link /> is just NextJs' implementation of an <a /> tag, but with various functionalities that make it super useful to use in the platform, and MyFriendbadge and FriendBadgeContainer are components I actually wrote! I won't delve too deep into their code, but these are their snippets respectively:
MyFriendBadge
const MyFriendBadge = () => {
  const temporaryBadgeData = {
    blogUrl: "https://waddle.neocities.org",
    imageUrl: "https://i.imgur.com/BwkY6WR.png",
    blogName: "blee",
  };

  const codeSnippet = `
<a href="https://waddle.neocities.org" target="_blank" rel="noreferrer">
  <img src="https://i.imgur.com/BwkY6WR.png" alt="A button that links to blee's neocities blog" />
</a>`;

  return (
    <div className="friend-badge__container m-4 flex flex-col items-center justify-center gap-1">

      <FriendBadge
        key={crypto.randomUUID()}
        blogUrl={temporaryBadgeData.blogUrl}
        blogName={temporaryBadgeData.blogName}
        imagueUrl={temporaryBadgeData.imageUrl}
      />      <figure className="codeblock__container mt-1 max-w-[30ch]">

        <CopyBlock
          text={codeSnippet}
          language="html"
          showLineNumbers={true}
          theme={dracula}
          codeBlock
        />
      </figure>
    </div>
  );
};

export default MyFriendBadge;
FriendBadgeContainer
import FriendBadge from "./FriendBadge";

const FriendBadgeContainer = () => {
  const temporaryBadgeData = [
    {
      blogUrl: "https://seafare.neocities.org/",
      imageUrl: "https://i.imgur.com/WAFA65o.png",
      blogName: "jamie",
    },
    {
      blogUrl: "https://killdragons.neocities.org",
      imageUrl:
        "https://killdragons.neocities.org/images/killdragons_button3.png",
      blogName: "cody",
    },
  ];

  return (
    <div className="friend-badge__container m-4 flex gap-1">

      {temporaryBadgeData
        ? temporaryBadgeData.map((blogDetails) => (
            <FriendBadge
              key={crypto.randomUUID()}
              blogUrl={blogDetails.blogUrl}
              blogName={blogDetails.blogName}
              imagueUrl={blogDetails.imageUrl}
            />
          ))
        : null}

    </div>
  );
};

export default FriendBadgeContainer;
FriendBadge
import Image from "next/image";

interface FriendBadgeProps {
  blogUrl: string;
  imagueUrl: string;
  blogName: string;
}

const FriendBadge = ({ blogUrl, imagueUrl, blogName }: FriendBadgeProps) => {
  return (
    <a href={blogUrl} target="_blank" rel="noreferrer">

      <Image
        src={imagueUrl}
        alt={`A button that links to ${blogName}'s neocities blog`}
        width={88}
        height={31}
      />
    </a>
  );
};

export default FriendBadge;
Pretty code heavy considering all I needed to do was just do something like:
<a href="foo.bar">
  <img src="imagehost.com" alt="alt text" />
</a>
For each button/badge I get right? Well, I'm a big fan of frontloading complexity, so all that means that whenever I'm ready to add a new button, I just need to add the valid data here:
const temporaryBadgeData = [
  {
    blogUrl: "https://seafare.neocities.org/",
    imageUrl: "https://i.imgur.com/WAFA65o.png",
    blogName: "jamie",
  },
  {
    blogUrl: "https://killdragons.neocities.org",
    imageUrl:
      "https://killdragons.neocities.org/images/killdragons_button3.png",
    blogName: "cody",
  },
];
(Hey hey shoutouts to Jamie and Cody btw, Jamie actually being the person to inspire me to start up with neocities!)
and it'd auto create a new button, with layout etc already done. Also, in the future i'll prob just save all of the badges info in supabase or something, to make it even easier for me! And this'll be the ongoing theme in this series--stuff that looks needlessly complex but built with the goal of making my life way easier in the future. (As a spoiler for the next article, I'd say that this entire post was written in Markdown, and I'm just gonna paste all this directly into a file and let it work its magic to post to my site without worrying about html or anything)
So yeah. thanks for surviving, and look forward to seeing more as I make more progress! Chapter 2 will be about how I worked MDX into the site, as well as all the bloody problems it gave me 😐.
Cya!