04__HomePage--Desktop
Hey yall, Happy Valentines!
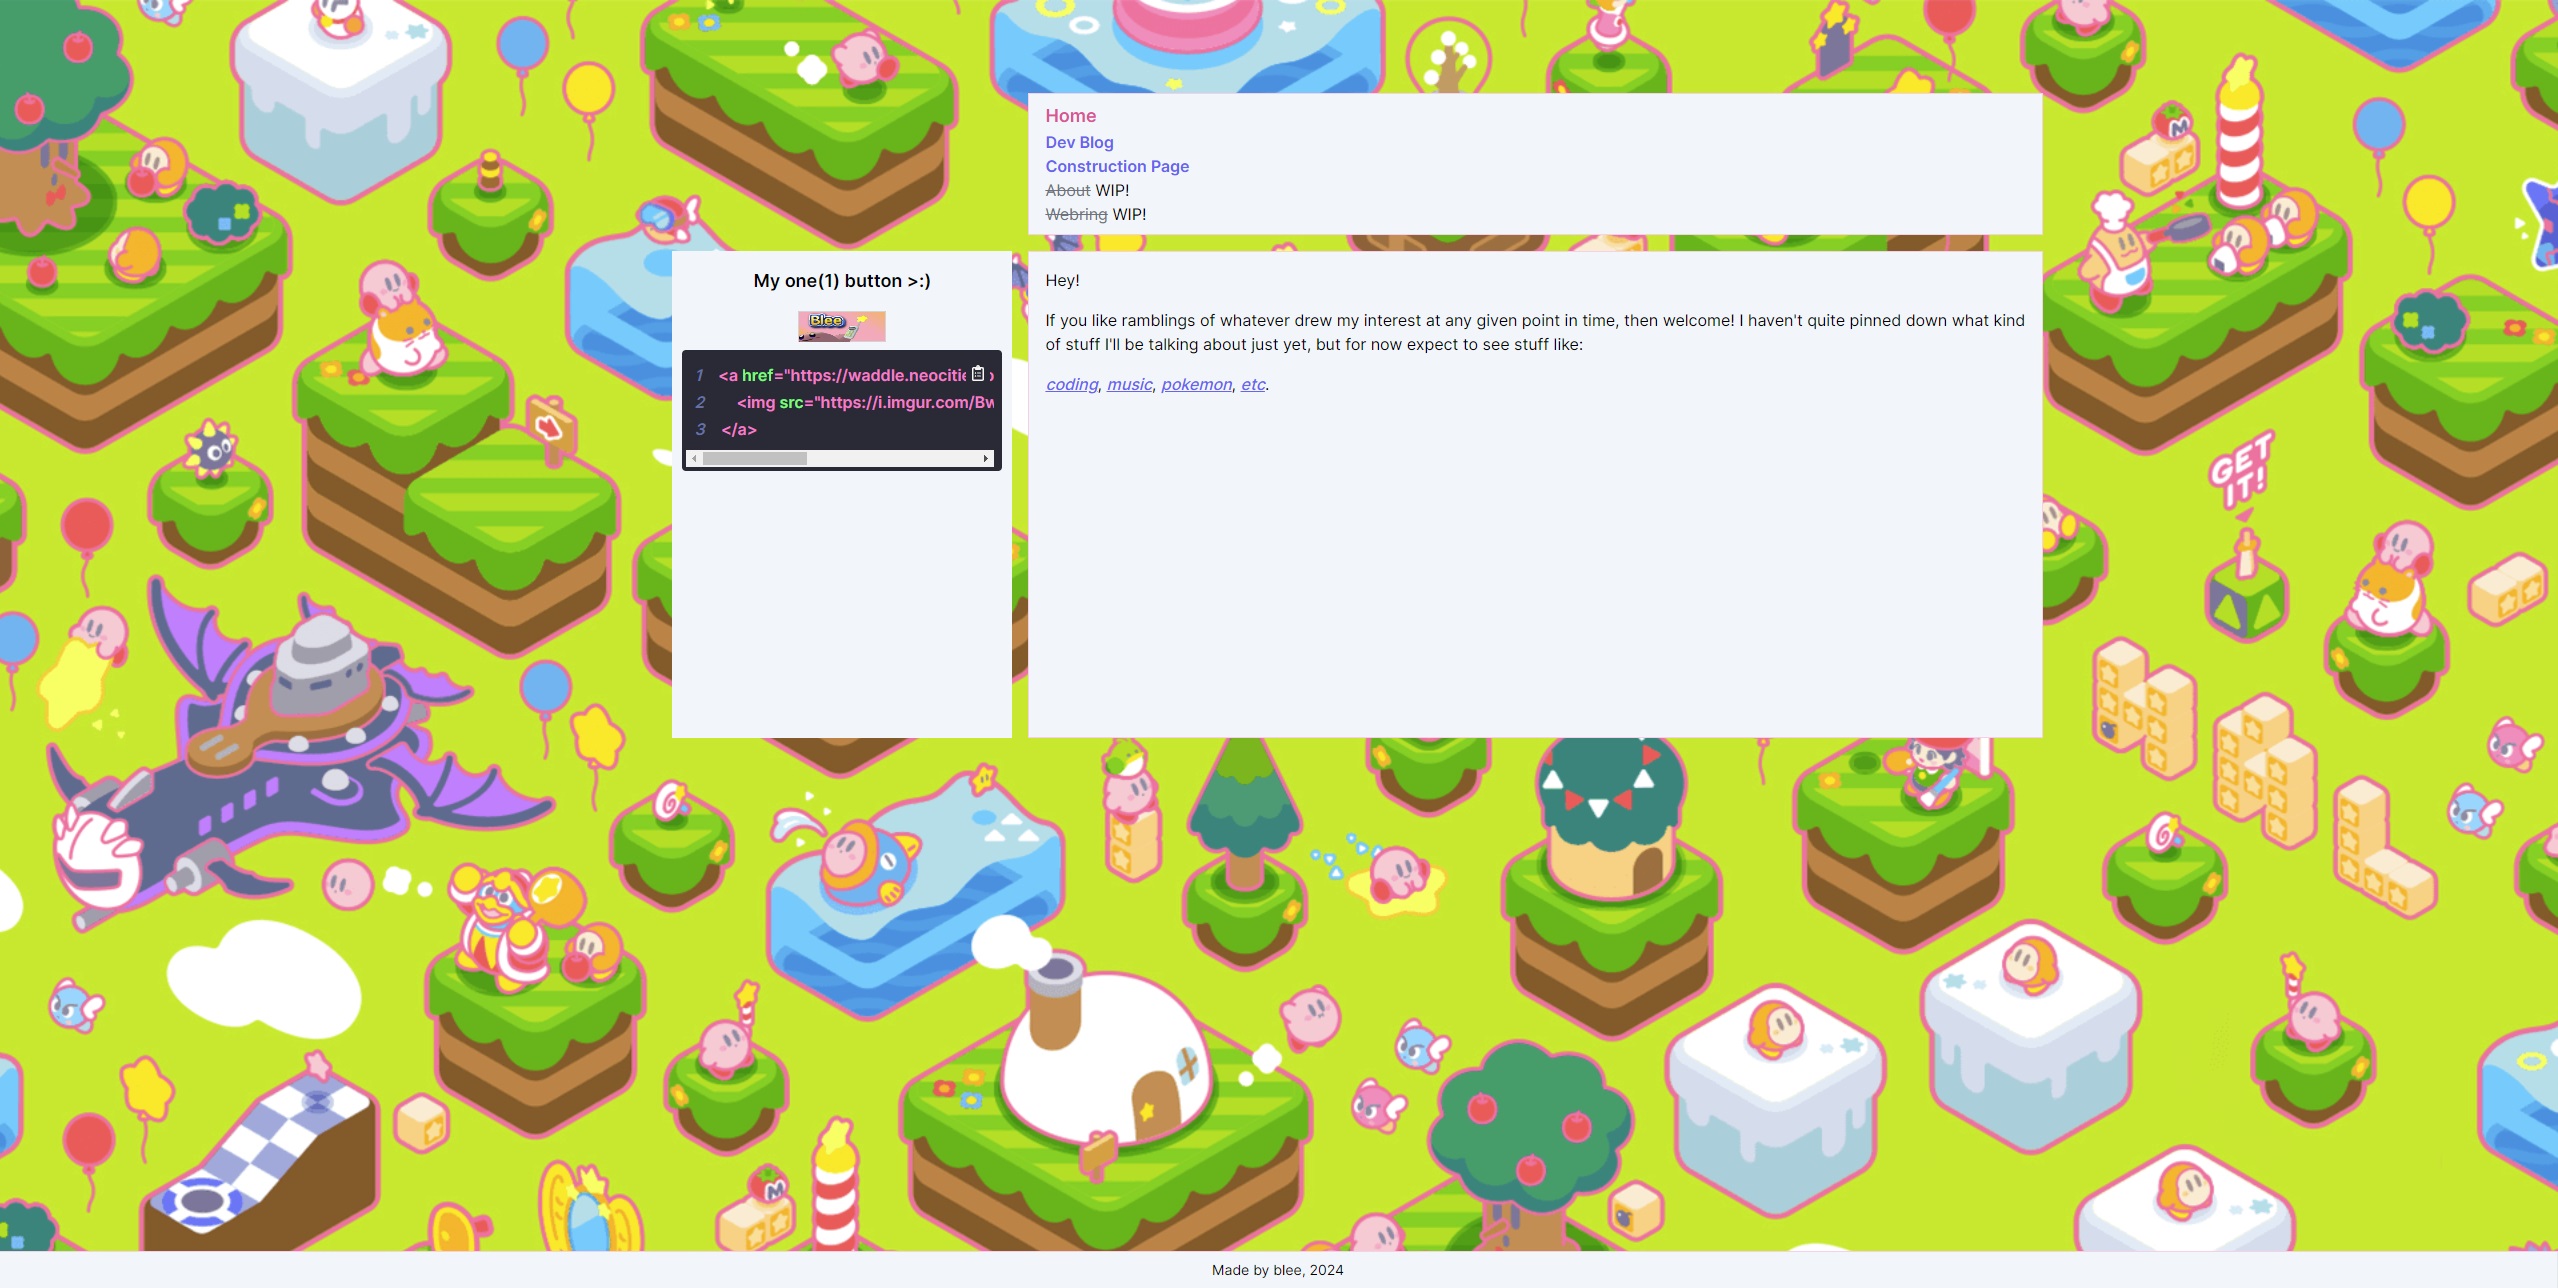
Today's update should be pretty short, since it's more CSS stuff so let's just show you the v0 layout i did on desktop!
Coding
Nothing fancy, but(as always) I hid some super fun techniques in here. Let's check out our HomePage's code:
<main
  className="flex min-h-dvh flex-col items-center gap-4
      bg-slate-400 bg-cover bg-no-repeat pb-12 sm:grid sm:grid-cols-5 sm:grid-rows-5"
  style={{
    backgroundImage: `url(${backgroundImage})`,
  }}
>
  <Navbar />
  <Preamble />
  <ButtonContainer />
  <Footer />
</main>
It should look super similar to how it did on our mobile layout, but check these out:
sm:grid sm:grid-rows-5 sm:grid-cols-5
Ta-Da! This is how Tailwind handles their media queries. The sm keyword might trip you out, since you might think that refers to the mobile design, but tailwind actually defaults to all their media queries using min-width instead of max-width. Mobile first design, remember? So I'm basically saying:
@media (min-width: 640px) {
    .sm\:grid {
        display: grid;
    }
    .sm\:grid-rows-5 {
        grid-template-rows: repeat(5, minmax(0, 1fr));
    }
    .sm\:grid-cols-5 {
        grid-template-columns: repeat(5, minmax(0, 1fr));
    }
}
Not too shabby. I wish i could just neaten up this approach a bit by placing an array of instructions within one sm: modifier but honestly this way is better for autocomplete and granular constrol so it's fine anyway.
But yeah basically that's how I handled converting our layout to grid once we pass our mobile breakpoint! I can show the other components but all that was really done was adding some grid positions etc based on media query, so not worth the extra typing imo. Instead, lemme show you something fun!
Something Fun
So, you may or may not have noticed (better if you didn't notice consciously, since as the adage goes: "Good UX gets highlighted and talked about as it's usually clever, Great UX gets ignored as it usually so much sense to the user that it reverts to being unremarkable"), the homepage no longer does incremental loading of its background image! So let's talk about that for this post instead.
Let's get something out of the way first. I basically XCopied the entire implementation from here. The implementation is way better written there as well, and if you don't know about this site yet, then you're welcome. Also, as a bonus sight, This guy is increeeedible at CSS/Design so def check him out too! (Also the latter link is super useful since I see tons of people including myself a while back use rems for padding etc since they fell into the trap of trying to make everything accessible which ended up working in reverse and breaking the site for visually impaired people).
But anyway, back to the main issue: I hate seeing incremental load of images, particularly ones as busy as my current background! If it's just a regular pattern which'll load pretty fast, then you're fine. But when you get into something more complex and bright as mine, well...It looks messy. So! let's break down our steps:
Tasks
- Create tiny.Like SUPER tiny image.
- Convert Image to BASE64 (Realistically this is only worth doing on a tiny image )
- Create SVG with blur filter applied, and load our image inline into it
- Make image available to use in CSS
- Preload our large image
- Swap out our blurred image once our large image is fully loaded.
Create tiny.Like SUPER tiny image.
This was super simple, I just opened my main image in Photoshop and made a super tiny image following the pre-linked guide. I think it was 40x22 pixels?
Convert Image to BASE64 (Realistically this is only worth doing on a tiny image )
This was kinda glossed over in the guide, but I used this website to get our Base64 encoding.
Create SVG with blur filter applied, and load our image inline into it
In this case, I copied the template from the guide, and added my Base 64 encode that I got in the previous step:
<svg xmlns="http://www.w3.org/2000/svg"
     xmlns:xlink="http://www.w3.org/1999/xlink"
     width="1920" height="1080"
     viewBox="0 0 1920 823">
  <filter id="blur" filterUnits="userSpaceOnUse" color-interpolation-filters="sRGB">
    <feGaussianBlur stdDeviation="20 20" edgeMode="duplicate" />
    <feComponentTransfer>
      <feFuncA type="discrete" tableValues="1 1" />
    </feComponentTransfer>
  </filter>
  <image filter="url(#blur)"
         xlink:href="data:image/jpeg;base64, (add base encode here,
         eg: /9j/2wCEAAEBAQEBAQEBAQEBAQEBAQEBAQEBA
         QEBAQEBAQEBAQEBAQEBAQEBAQEBAQECAgICAgICAgICAgMDAwM... etc ) "
         x="0" y="0"
         height="100%" width="100%"/>
</svg>
Just in case you're still a little lost, This is the actual full code that I used here, look at where my base encode that starts withy /9j/ is inserted.
Make image available to use in CSS
Unlike with the Base64 Encode site, the guide directly recc's a site to us to ensure that our Inline SVG is URI encoded(basically so that we can just use it directly in our CSS).
"data:image/svg+xml,%3Csvg xmlns='http://www.w3.org/2000/svg' xmlns:xlink='http://www.w3.org/1999/xlink' width='1920' height='1080' viewBox='0 0 1920 1080'%3E%3Cfilter id='blur' filterUnits='userSpaceOnUse' color-interpolation-filters='sRGB'%3E%3CfeGaussianBlur stdDeviation='20 20' edgeMode='duplicate' /%3E%3CfeComponentTransfer%3E%3CfeFuncA type='discrete' tableValues='1 1' /%3E%3C/feComponentTransfer%3E%3C/filter%3E%3Cimage filter='url(%23blur)' xlink:href='data:image/jpeg;base64,/9j/2wCEAAEBAQEBAQEBAQEBAQEBAQEBAQEBAQEBAQEBAQEBAQEBAQEBAQEBAQE
BAQECAgICAgICAgICAgMDAwMDAwMDAwMBAQEBAQEBAgEBAgICAQICAwMDAwMDAwMDAwMDAwMDAwMDAwM DAwMDAwMDAwMDAwMDAwMDAwMDAwMDAwMDAwMDA//dAAQABf/uAA5BZG9i
ZQBkwAAAAAH/wAARCAAWACgDABEAAREBAhEB/8QAeAAAAgMBAAAAAAAAAAAAAAAABwkEBggFAQACAgIDAAAAAAAAAAAAAAAFBgcIBAkAAwoQAAIDAQEAAQQDAAMAAAAAAAQFAgMGAQcTCBESFQAUFiE
xQhEAAgMBAAICAgMBAQAAAAAAAwQBAgUGBxITFAgRABUjISL/2gAMAwAAARECEQA/AGheKew67xfz935UyYX+Y49up7jcEBpklDnV6DetT3zw0djkVjdxpGWRvDlbWERZaJJlZTbWNP
4pffmkrX88d5RfudbLjJuXs1Tm2mRQVwSgE1xq540jRAVss5/l+C5iCaqCDidYFDAveRQeXz+FwLjNNMPj8pb3hHPuxsSpByWle+ix7REIN2IEScksMlKR8p71qStILI2DP0/oqXVUb
7S4CtmxyoLbOT0Wbv8AOvW61C2YAx6af2Kf+c53vwyrccjON5Nf50/FwintkkTa5jx7l+PMDR8T9BpbvQPYDr23qt5TwB89tL6K7AkGHlh3Tc/Tt7HV0C+yS31Q6LDZ02pUAQw0trcr
pbHRcxRJANTJqayWj9hXYVpWIijgUq3DagqzWFxEsve9/aLFKOlptwNoxa4JuvWYVxo2eqnv+YgrTuWJfpPifnae35xXr1u3peJTqgVkuQ6LczsMaRj2Af48rlPvLJd1+Tfmz8gfH+o
...etc"
Preload our large image
All right this is where things get a lil funky for me! Lemme just add in my code to preload our image:
 const [backgroundImage, setBackgroundImage] = useState<string | null>(
    placeholderURL
  );

  useEffect(() => {
    const preloadImage = async (src: string) => {
      try {
        const img = new Image();
        await new Promise<void>((resolve, reject) => {
          img.onload = () => {
            setBackgroundImage(src); // Set the background image once it's loaded
            resolve();
          };
          img.onerror = reject;
          img.src = src;
        });
      } catch (error) {
        console.error(`Error preloading image: ${src}`, error);
      }
    };

    const imageSrc = "/images/kirby_1080_edit_compressed.png";

    console.log({
      preloadLog: preloadImage(imageSrc),
    });
  }, []); // Empty dependency array ensures this effect runs only once on mount
Ok, so we make our preloadImage firstly require a url as its param. Pretty simple, we just pass the src of the url we wish to preload, in this case our Large image that we're using for our background image. Then it loads it in the back, and swaps our placeholder url with our now fully loaded image instead, giving us the seamless loading experience we wished for!
Swap out our blurred image once our large image is fully loaded.
So that's how we preload our image, but how do we use our placeholder and then swap it out once the primary image is loaded?? Let's Ignore a lot of our code, and hone in on the simple stuff first:
export const placeholderURL = `"data:image/svg+xml,%3Csvg xmlns='http://www.w3.org/2000/svg' xmlns:xlink='http://www.w3.org/1999/xlink' width='1920' height='1080'
viewBox='0 0 1920 1080' %3E%3Cfilter id='blur' filterUnits='userSpaceOnUse' color-interpolation-filters='sRGB'%3E%3CfeGaussianBlur stdDeviation='20 20' edgeMode='duplicate'
/%3E%3CfeComponentTransfer%3E%3CfeFuncA type='discrete' tableValues='1 1' /%3E%3C/feComponentTransfer%3E%3C/filter%3E%3Cimage filter='url(%23blur)'
xlink:href='data:image/jpeg;base64,/9j/2wCEAAEBAQEBAQEBAQEBAQEBAQEBAQEBAQEBAQEBAQEBAQEBAQEBAQEBAQEBAQECAgICAgICAgICAgMDAwMDAwMD... etc etc"`;
    const [backgroundImage, setBackgroundImage] = useState<string | null>(
        placeholderURL
    );


    <main
      className="flex-col items-center flex bg-slate-400 min-h-dvh
      bg-no-repeat bg-cover gap-4 pb-12 sm:grid sm:grid-rows-5 sm:grid-cols-5"
      style={{
        backgroundImage: `url(${backgroundImage})`,
      }}
    >
using String Interpolation, We're making sure that our background Image is set to whatever value backgroundImage currently has. Realistically, I should have named it backgroundImageURL to be clearer, but it's fine in this case since technically our default value's an inline loaded image anyway.Oh also we're actually not using our .svg file anymore now that we got its code but, I kept it physically for demo purposes/just in case I want to use it for other places.
BUT ANYWAY. Since we have our value stored in State, we can simply modify our state here:
 await new Promise<void>((resolve, reject) => {
          img.onload = () => {
            setBackgroundImage(src); // Set the background image once it's loaded
            resolve();
          };
          img.onerror = reject;
          img.src = src;
        });
So yeah, the cycle is basically:
- set default
backgroundImagevalue to our placeholder URL that we got from our CSS util (placeholderURL) - use our
backgroundImagevalue as our url for our page. - Preload our primary, large image.
- Once preloaded, change our
backgroundImagevalue to our primary image's url that we provided to ourpreloadImagefunction - Watch our image get swapped in realtime!
See the setBackgroundImage thing? Yeah that' show we update our state, so this is how our background image src goes from "placeholder image" to our "main background image". And hey presto, it works! Honestly a pretty cool implementation, and I'm normally so used ot relying on utils etc that doing it myself felt pretty cool.
Anyway, enough yapping from me, thanks for reading, and cya!